From Dev Team Blog:
"Today we released an ultrasn0w update that fixes an issue for those running firmware 3.1.x with the 04.26 baseband. That specific combination resulted in a missing carrier name in the upper left-hand corner of your home screen. Today’s ultrasn0w update from 0.91 to 0.92 fixes that problem (which was an important issue for roaming). You should see the update available if you have http://repo666.ultrasn0w.com as a Cydia source. Enjoy!"
Friday, 13 November 2009

How to create a unique certificate for your iPhone for Push Notification
First, a big thanks to Aviegas for writing this tutorial. This tutorial appeared in a different long thread. For the history of the original discussion, you can read it here. By making it into a new thread and sticky, it will be easier for users to follow and easier to find.
You need to get Dev Team's PushFix here. You need it for generating & injecting the certs.(Don't get mix up with the PushFix available in Cydia that people are using (cydia.iphoneil.net) after jailbreaking with blackra1n RC3)
To generate a cert, one must:
1) Start with a clean iPhone, after a RESTORE with a Pwned (Custom) IPSW *WITHOUT HACKTIVATION*
2) iTunes activate for Apple to sign the new set of certificates
3) Install (Cydia) SSH or terminal
4) Install a valid PUSH App and RUN THE APP (this will activate the certificates)
5) Install "nimble" (from the Dev Team Fix package), using SFTP or iFunBox, on the /Library/Keychains directory
6) Open a root shell on the iPhone (SSH or "terminal" + "su -") and "cd /Library/Keychains"
7) Make "nimble" executable: chmod +x nimble
8) Then "nimble" (extract) the certificates
9) Copy the 4 .bin files to a safe directory on your Mac/PC using SFTP or iFunBox
10) Zip the directory, send to the lucky receiver AND ERASE IT SO THAT ONLY ONE PERSON WILL HAVE THIS SET OF CERTIFICATES
11) Remove all files and folders in "/private/var/root/Library/Lockdown"
12) Turn "Push notifications" OFF and remove the PUSH APP you installed
13) Reboot the iPhone
14) iTunes activate for Apple to sign the new set of certificates
15) GO TO STEP (4)
Now to install the certificates:
1) Start with a jailbroken and hacktivated iPhone AND REMOVE ALL PUSH NOTIFICATION APPS AND TURN NOTIFICATION OFF
2) Install (Cydia) SSH or terminal
3) Copy (SFTP or iFunBox) the 4 bin files and "inject" (from the Dev Team fix) to /Library/Keychains"
4) Open a root shell on the iPhone (SSH or "terminal" + "su -") and "cd /Library/Keychains"
5) Make "inject" executable "chmod +x inject"
6) Run "inject"
7) remove "inject" and the bin files from your iPhone
8) Reinstall the required PUSH APP and test
9) On your PC, save the bin files for future use, but ONLY ON THIS IPHONE. DO NOT SHARE THIS FILES OR EVEN INSTALL ON ANOTHER IPHONE.** THE SET OF CERTIFICATES ARE UNIQUE TO AN IPHONE
**The certs contains an UUID (unique ID) that is used to distinguish the phones for PUSH notifications. If 2 iPhones have the same certs, push notifications will not be able to distinguish them and the last one to register with the push server will be the one active.
** If you have a hacktivated iPhone, then the *only* way to get push notification is to make the "certificate transplant" and keep them *unique*.
Dtube - Hackint0sh.
Friday, 6 November 2009
Goodbye Gsmvn............!!!!!!!!
i will remember to all. The Box of GSMVN is my home. i will back again on early time.
Tuesday, 3 November 2009
Monday, 2 November 2009
How to change Root Password on jailbroken iphone
1. Run Terminal
2. Type su
- And Type alpine
After passwd for change new password.
Finish, Quitting out from Terminal
2. Type su
- And Type alpine
After passwd for change new password.
Finish, Quitting out from Terminal
BlackRa1n Unlock by Geohot
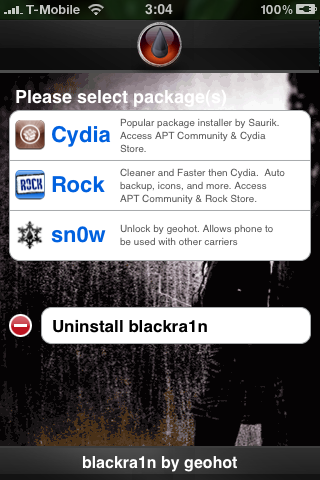
Geohot has posted the first screenshot of his blacksn0w unlock for the iPhone 3G and 3GS.The unlock which will be run after completing a jailbreak with the blackra1n jailbreak is expected to be released on November 4th.Blacksn0w does support the latest 05.11.07 baseband so for those who accidentally upgraded, you will be able to get your unlock back!
From: iC.
Saturday, 17 October 2009
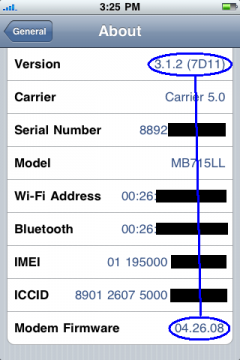
Custom fw 3.1.2 for 3GS User released. Download now
iPhone2_1_3.1.2_7D11_Custom_Restore_Gsm.vn.ipsw
Detail:
608Mb Root
Clear fw with OpenSSH, OpenSSL, Cydia, Mobile Terminal added
iPhone2_1_3.1.2_7D11_Custom_Restore_Gsm.vn.ipsw
Detail:
608Mb Root
Clear fw with OpenSSH, OpenSSL, Cydia, Mobile Terminal added
Thursday, 15 October 2009
GSMVN's Custom fw 3.1.2 & ultrasn0w work fine on iPhone 3gs with me
I upgraded my 3gs with custom fw3.1.2. Ultrasn0w worked fine and Appsync for fw 3.1.2 worked on fw 3.1.2, too. Thanks so much to Dev team & Geohot.
Back up ecid/shsh 3.1/3.1.2 now with firmwareumbrella has been updated! Link to umbrella: thefirmwareumbrella.blogspot.com
Back up ecid/shsh 3.1/3.1.2 now with firmwareumbrella has been updated! Link to umbrella: thefirmwareumbrella.blogspot.com
Sunday, 11 October 2009
BlackRa1n Jailbreak is Live [Windows Only]
GeoHot has released his BlackRa1n jailbreak for Windows users only. BlackRa1n should work on all devices using OS 3.0 and up. Please note that the new iPod touch requires a tethered jailbreak. Meaning, if you let the battery die you will need to use BlackRa1n to boot it again.Also, its important to note that BlackRa1n does not hactivate your iPhone. This means that you must be using an official Apple carrier for activation purposes.
No word yet on a Mac version.
You can download the jailbreak utility from here.
We will have a short tutorial on this within the next few minutes

No word yet on a Mac version.
You can download the jailbreak utility from here.
We will have a short tutorial on this within the next few minutes

iC
ultrasn0w also works on firmware 3.1.2

MuscleNerd, a member of Dev-Team, and through a new tweet to inform the public of the proper functioning of ultrasn0w, the program that lets you unlock the phone in iPhone 3G/3GS foreigners with baseband 04.26.08, even the new firmware 3.1.2 released a few days ago by Apple.
Surenix
BlackRa1n Jailbreak to Go Live in One Hour
GeoHot has announced that the BlackRa1n jailbreak will be available in one hour, at 4am EST. According to a post on his blog, once the topic "#blackra1n" begins trending on Twitter he will put the download link up.So, what is blackra1n? blackra1n is a 30 second ALL device 3.1.2 jailbreak. Even the ipt3, but the ipt3 is tethered. In order to boot it, just rerun blackra1n. As far as donations go, they are much appreciated, but not until after blackra1n works for you. I never ask for donations before the tool is released.WARNING: BlackRa1n will not hacktivate. This means that if you are not with an Apple approved carrier your iPhone will not be activated by BackRa1n. Hopefully, hacktivation and full ipt3 support will be added in a future update.We will post a news article and a tutorial as soon as the jailbreak becomes available.
iC
iC
GeoHot: Summary progress on blackra1n

GeoHot's back to the office and has published two new and interesting Tweet. Both concern blackra1n, and particularly to informed us of all the things that are missing and all devices that is now supported. Let's see what's missing:
Support iPod Touch 3G;
Hacktivation (for iPhone EDGE iPhone 3G/3GS in Italy or abroad);
The resolution of a bug on kernelcache;
Finalization of the final
For the last 2 days... this is what blackra1n supports:
The iPhone 2G (for use with AT & T in America);
The iPod Touch 1G;
The iPhone 3G;
The iPod Touch 2G;
Switch to iTunesmobiledevice
Blackra1n Application for iPhone (able to download Cydia)
Stability Please get on the 3GS That's what I'm looking for.Note: The list is not the iPhone but in many 3GS Tweet GeoHot said bladra1n the support that the native firmware 3.1 is vulnerable and that his hack works on 3.1.2 so it is fairly secure and under understood.
Update 1: The Chronic DevTeam asked if the GeoHot Jailbreak iPod Touch 3G will be of tethered or untethered and he said that for now this is the second method because his little problem with a library is not yet resolved.
Update 2: As I told you, GeoHot specify the blackra1n also supports the iPhone 3GS:
"3GS was the first thing supported, of course it is3GS was the first thing supported, of course it is "
Update 3: It's 3:10 and GeoHot finally found a hidden lib that he needed to unlock the iPod Touch 3G. Unfortunately, this new device does not appear vulnerable to the exploit 24kpwn (which he found himself, several months ago.) could release the tool with no support for this device, but as you know he loves the "perfection" ..Update 4: Geohot waves the iPod Touch 3G bye-bye (for now).Blackra1n supports all 5 devices except Apple's latest generation of iPods.By removing the iPod Touch, the issue is much more imminent than before. Update 5: Hours 04:41 - The iPod Touch is still vulnerable to the exploit 24kpwn but not in the manner to which they are accustomed, therefore causing problems with idei lib will not have iPod Touch 3G support.Currently, GeoHot is trying to contact RipDev's Icy Jailbreak application to add in his blackra1n
Surenix
blackra1n: Here's the icon on iPhone

Continue the progress of blackra1n, what you see in the picture is the icon of the tool that replaces the old "Freeze" from purplera1n.This means that the program is ready and apparently a version will be releasing today without the support iPod Touch 3G, which will then be added tomorrow or whenever.
The application Blackra1in on the iPhone would be designed to download and install Cydia. (Which then makes it pretty much... a Jailbreak)
Update: Apparently, even GeoHot does not believe in team AppuloHa1l and has just considered them as pretty funny - very funny in a new tweet. He also purchased the domain chocolatera1n.com, continuing to "deceive" the people.
Update 2: iH8sn0w has made a video which shows that AppuloHa1l and a team of hackers that it is fake, so do not expect the Jailbreak the iPod Touch 3G and 3GS from them. It must also be said that, realize this video iH8sn0w took about 4 hours, including filming, editing, uploading and processing and this probably means that it has to be done. Here's the video:
Surenix
chocolatera1n - BY Appuloha1l
Mmmm..... chocolatera1n!
Update: chocolatera1n supports Windows and Mac only, but not Linux. Only appuloha1l supports Windows, Mac, and Linux.
appuloha1l team member jay has been working on a seperate project called chocolatera1n. appuloha1l is a easy to use jailbreak, but chocolatera1n is more advanced.
Here is what chocolatera1n has:
A better ui than appuloha1l, but it is not a 1 click jailbreak
In the future if Apple blocks the usb exploit used by appuloha1l, only chocolatera1n will support the h1ssingsnake exploit.
Custom boot logo option
Download Cydia packages right from chocolatera1n
Hacktivation support
No need to download a new chocolatera1n, you can update chocolatera1n from the update menu whenever a new chocolatera1n is out.
and a lot more…
appuloha1l will be released on Sunday, but chocolatera1n is coming on Monday.
Follow Jay on Twitter @chocolatera1n if you are interested.
darkMatt3r
Tuesday, 6 October 2009
Saturday, 3 October 2009
Custom Firmware 3.1 (For iPhone 3GS)
Friday, 2 October 2009
How to Upgrade Your Jailbroken iPhone 3GS to OS 3.1
This tutorial will show you how to upgrade your jailbroken iPhone 3GS from OS 3.0.x to OS 3.1 using PwnageTool for Mac.
If you have a 3.0 iPhone you must jailbreak it using this (Mac, Windows) tutorial before continuing.
Step One
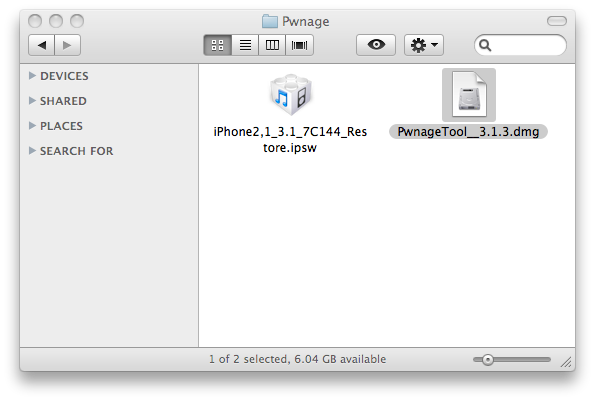
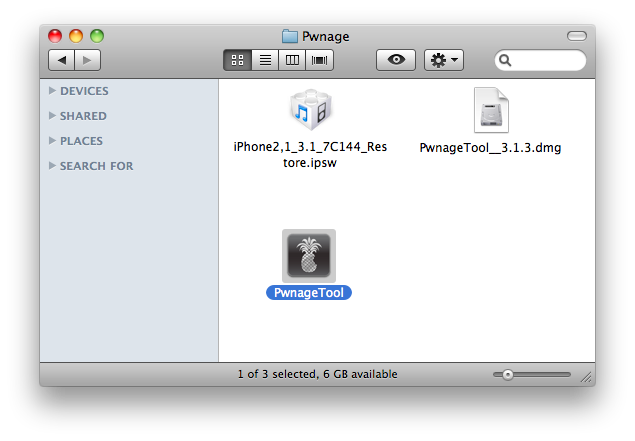
Make a folder called "Pwnage" on the desktop. In it, you will need a couple of things. PwnageTool 3.1.3, found here or here
You will also need the 3.1 iPhone firmware.
3.1.0 (3GS): iPhone2,1_3.1_7C144_Restore.ipsw
When downloading the IPSW file, it is best to download it with Firefox since Safari often auto extracts it!
Step Two
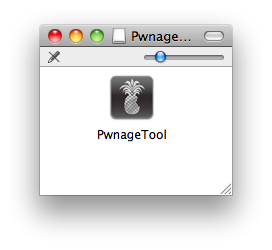
Double click to mount PwnageTool 3.1.3 then drag the PwnageTool icon into the Pwnage folder.
Then from the Pwnage folder double click to launch the PwnageTool application.
Click Ok if presented with a warning.
Step Three
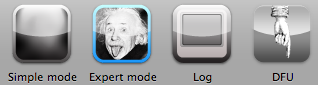
Click to select Expert Mode from the top menu bar
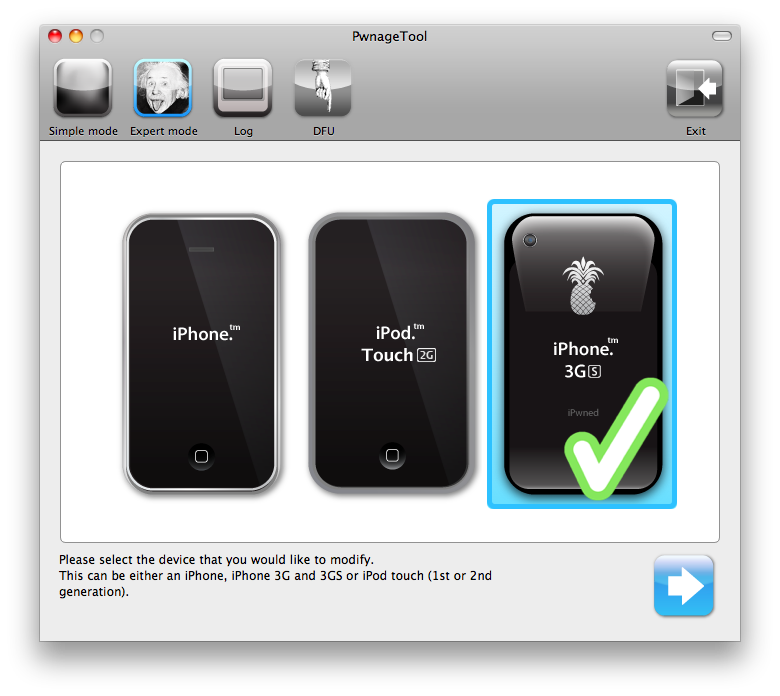
Step Four
Click to select your iPhone. A check-mark will appear over the image of the phone.
Step Five
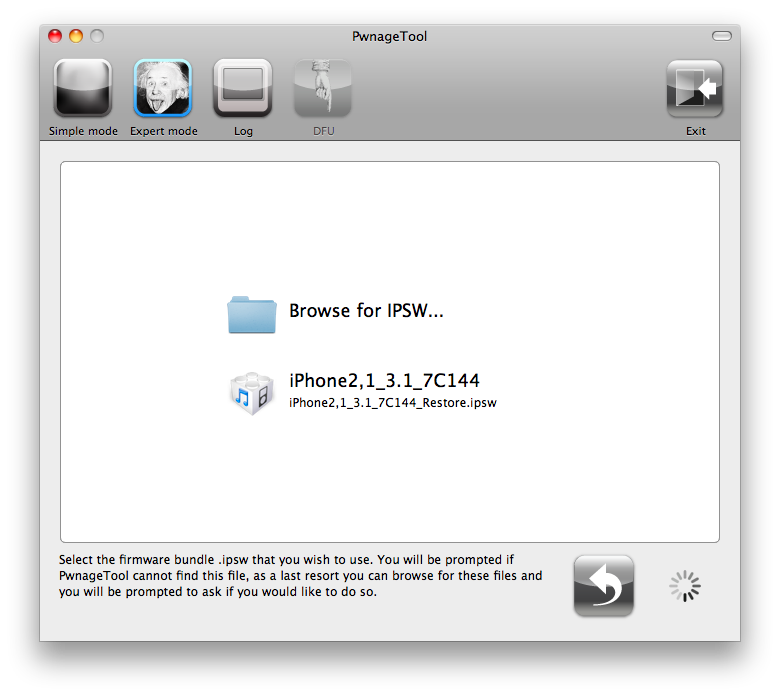
Click the blue arrow button to continue. You will be brought to the "Browse for IPSW" page. On my laptop, it automatically found the IPSW. If PwnageTool doesn't automatically find the ipsw file you can click Browse for IPSW....
Click to select the found IPSW file, a checkmark will appear next to it. Then click the blue arrow button to continue.
Step Six
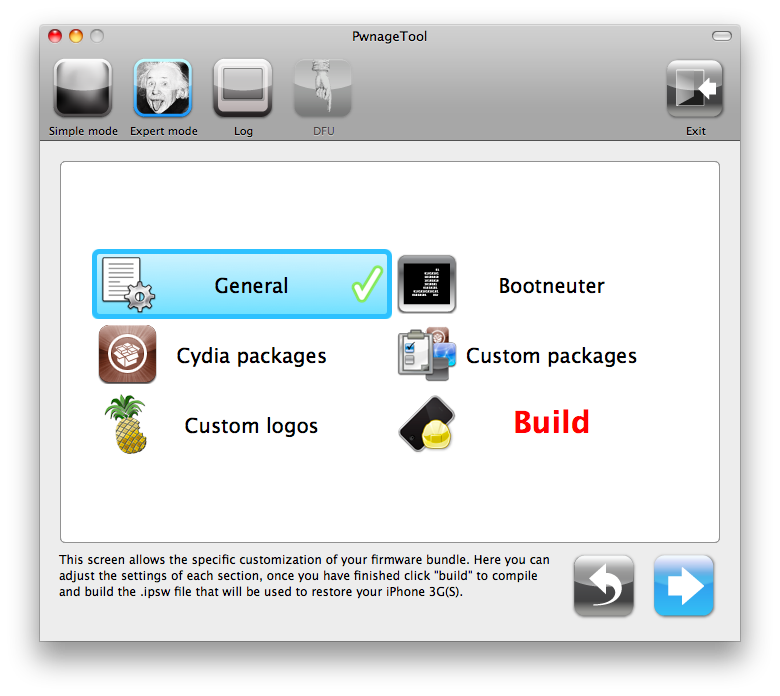
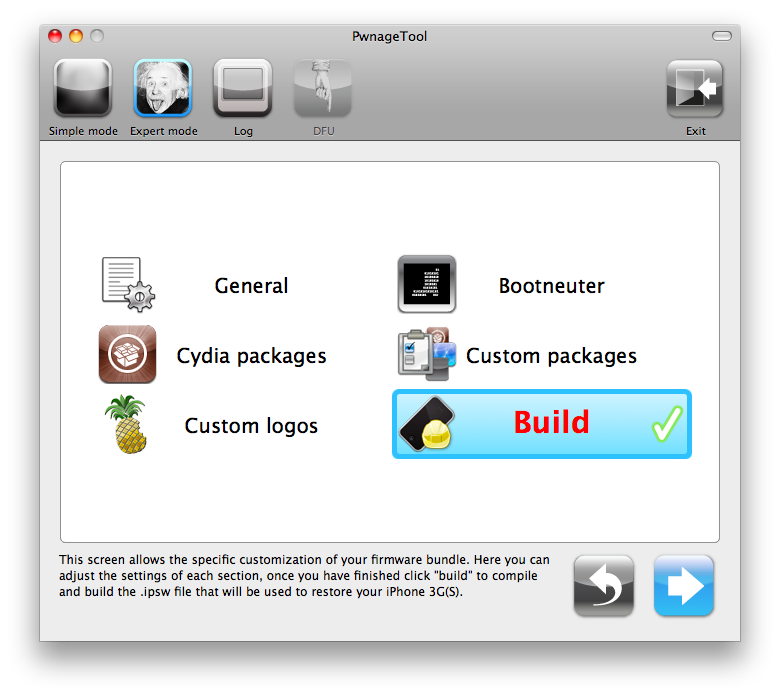
You will then be brought to a menu with 7 choices. Click to select General then click the blue arrow button.
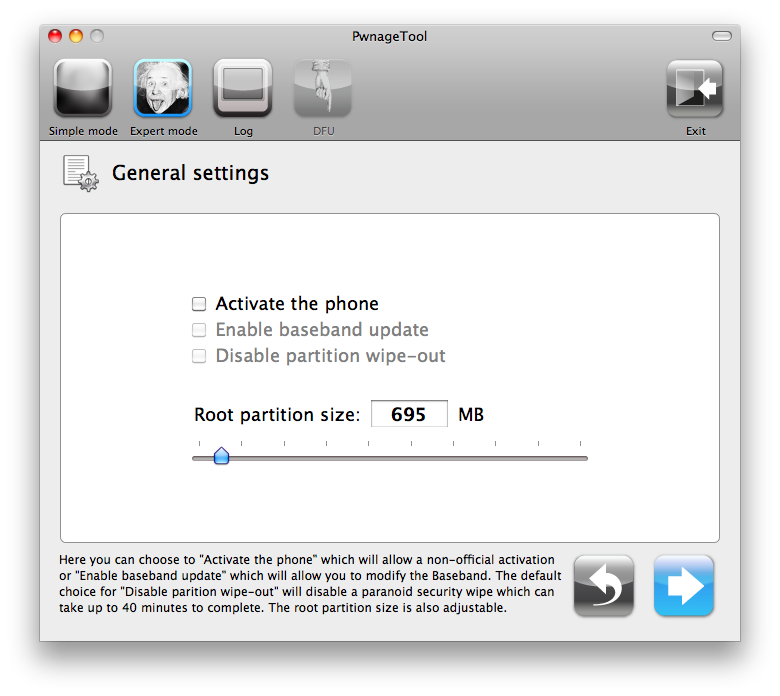
The General settings allows you to decide the partition size. Check Activate the phone if you are not with an official carrier then click the blue arrow button.
NOTE*: Deselect Activate if you have an iPhone legitimately activated on an official carrier.
NOTE*: You may need to increase the size of the root partition slightly. My first attempt failed at creating the IPSW until I increased the size to about 695 MB.
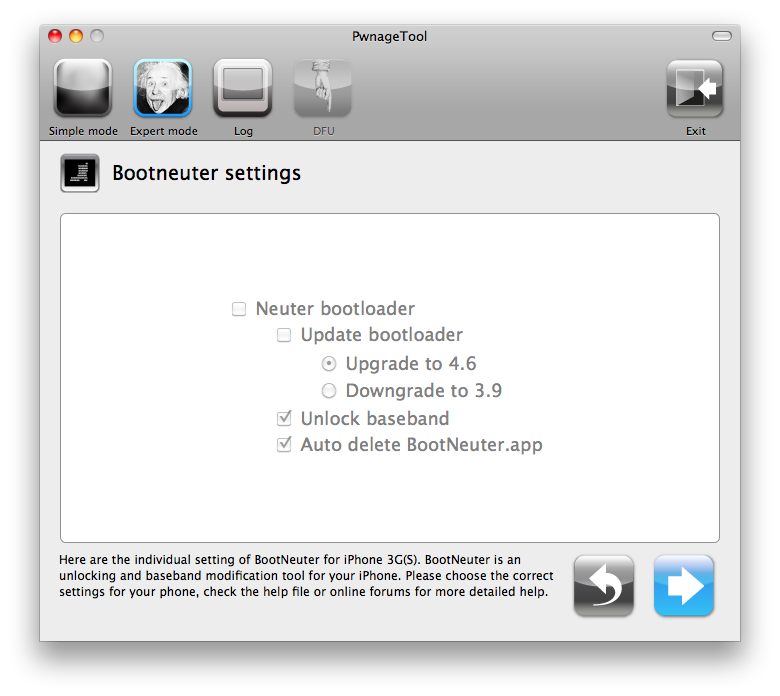
The Bootneuter settings are greyed out for the 3G iPhone. Click the blue arrow button.
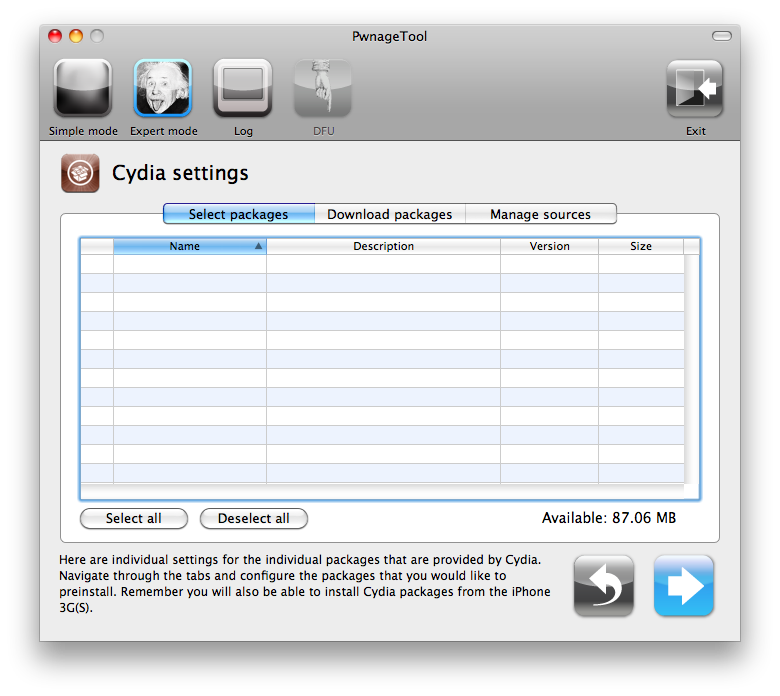
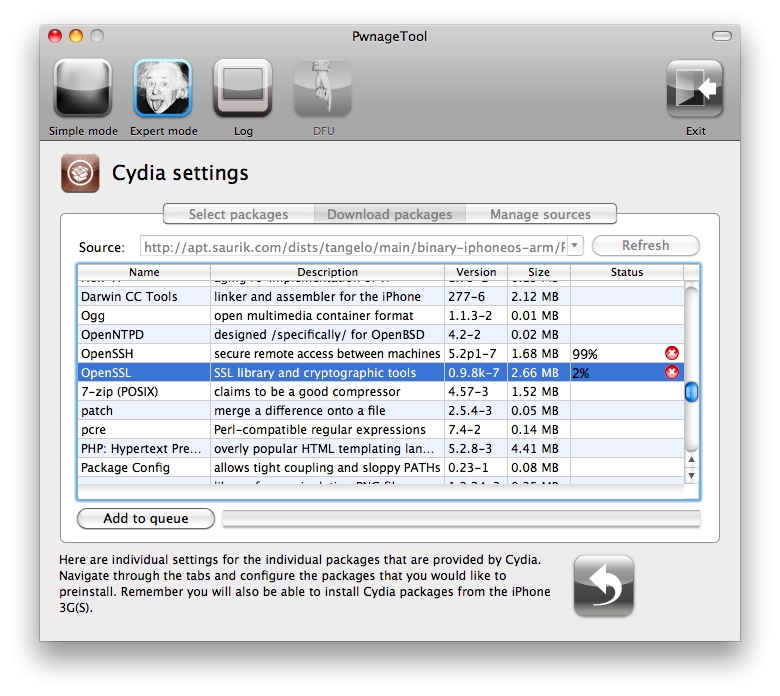
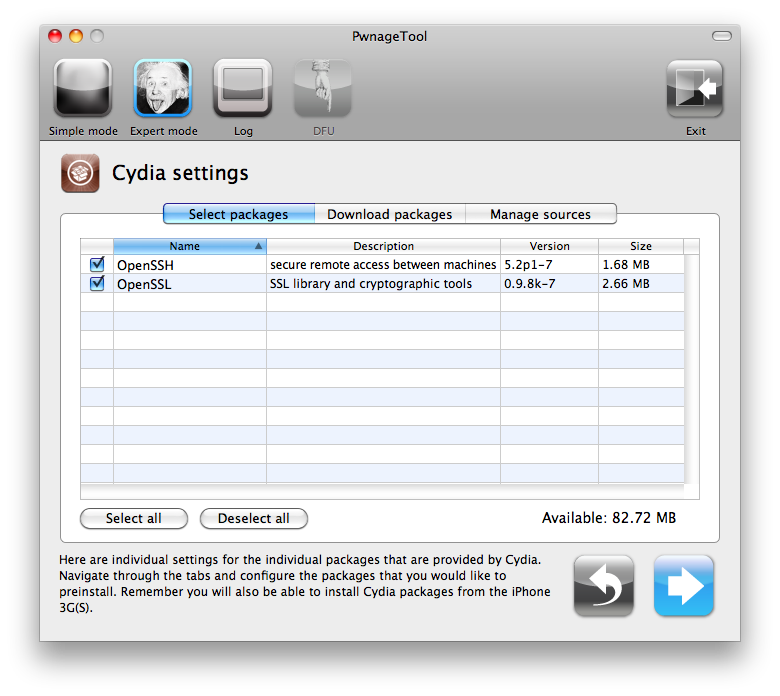
The Cydia settings menu allows you to create custom packages so you do not have to manually install the necessary them later.
Click to select the Download packages tab. Then click the Refresh button to display all the available packages. Double clicking the package you want will download it and make it available in the Select Packages tab.
Checkmark the ones you want then Click the blue arrow button.
The Custom Packages Settings menu displays listed package settings for your custom IPSW. For know leave these settings as is. Click the blue arrow button to continue.
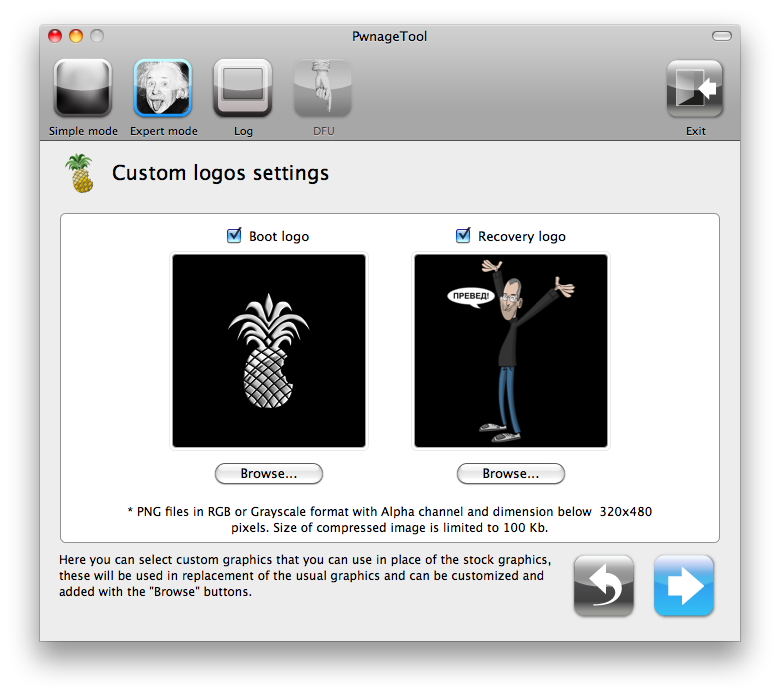
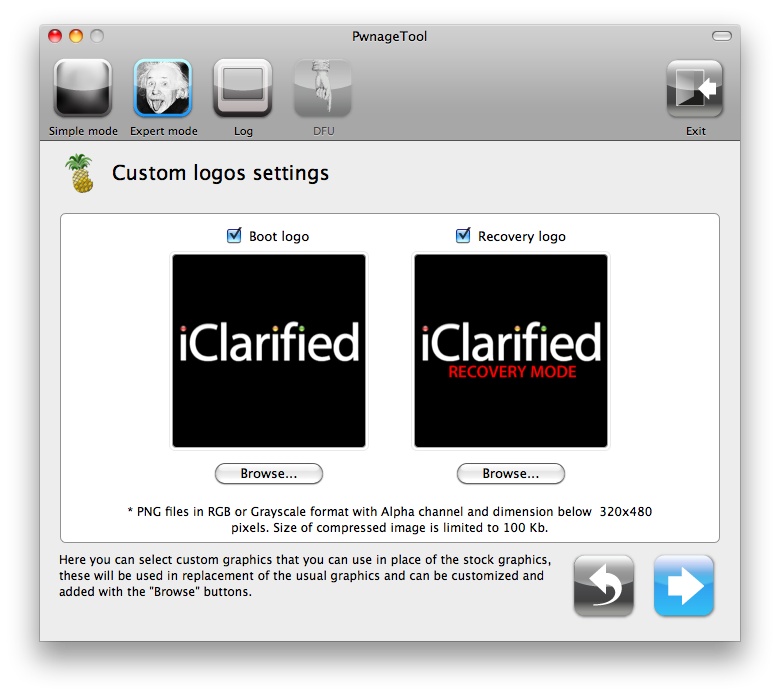
The Custom Logos Settings menu allows you to add your own images as boot logos. Click the Browse button to select your Boot logo and Recovery logo. If you would like to use the iClarified ones they can be found here: Boot Logo, Recovery Logo
Remember the rules for them: RGB or Grayscale format with Alpha channel and dimension bellow 320x480...
Click the blue arrow button to continue.
Step Seven
You are now ready to begin the pwnage process! Click the Build button to select it then click the Blue arrow button to begin.
Step Eight
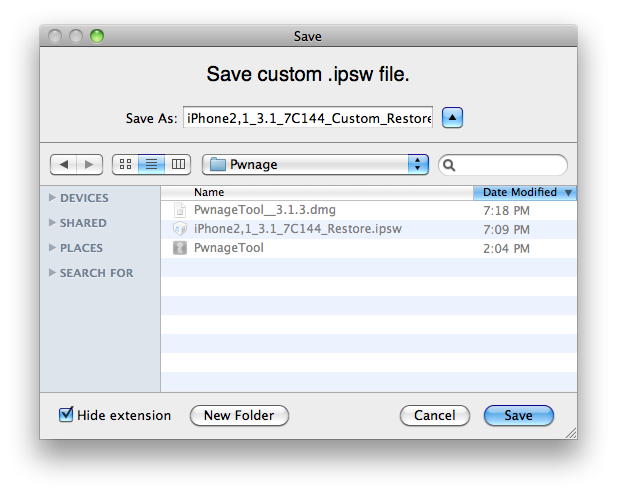
You will be asked to save your custom .ipsw file. Save it to your Pwnage folder you created on your Desktop.
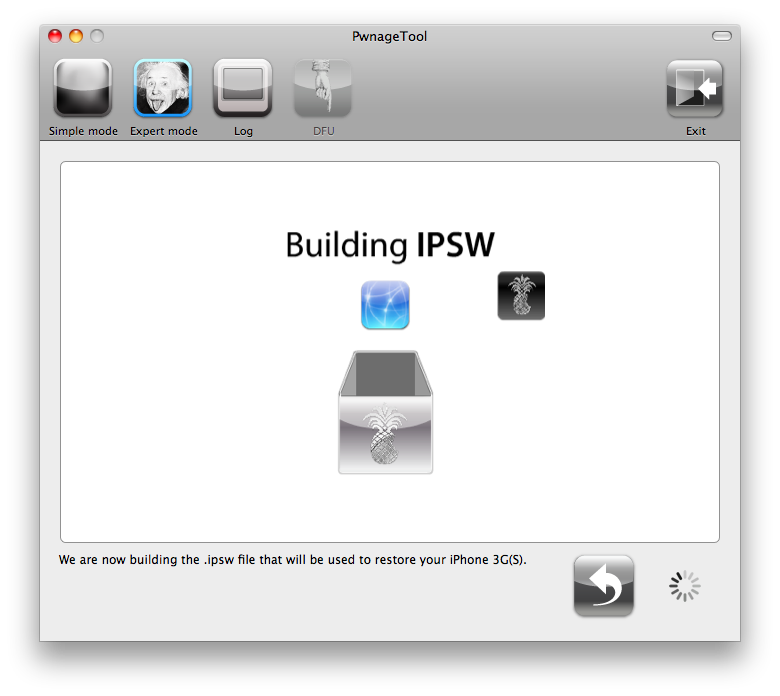
Your IPSW is now being built. Please allow up to 10 minutes.
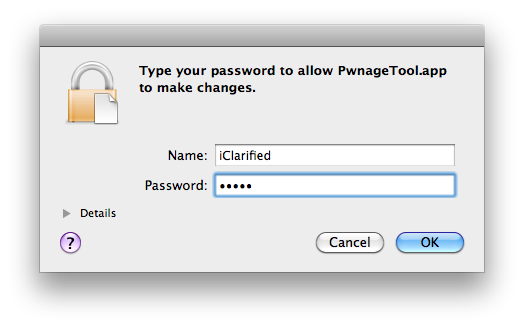
You will be asked to enter your administrator password. Do this then click the OK button.
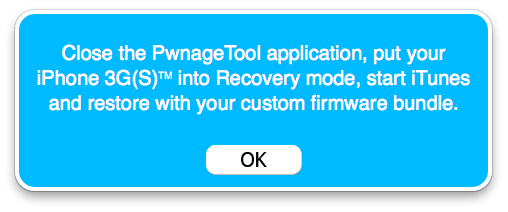
You will be prompted to close the PwnageTool application then put your iPhone into recovery mode. Click the OK button.
Step Nine
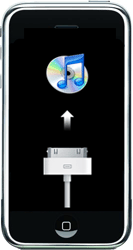
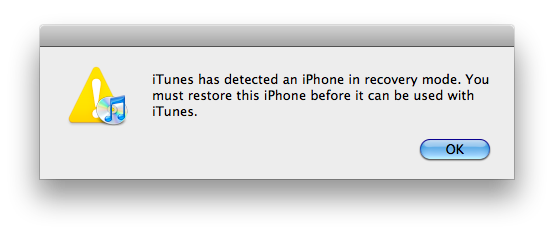
Make sure your iPhone is connected to the computer then follow these instructions to put your iPhone into recovery mode.
When done correctly your iPhone will display an image of the iTunes logo and a usb cable. iTunes will also pop-up saying it has detected an iPhone in recovery mode.
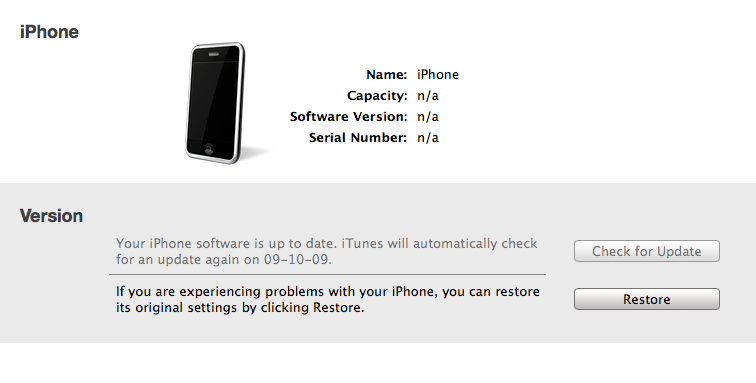
Step Ten
In iTunes, hold the Alt/Option key and click Restore.
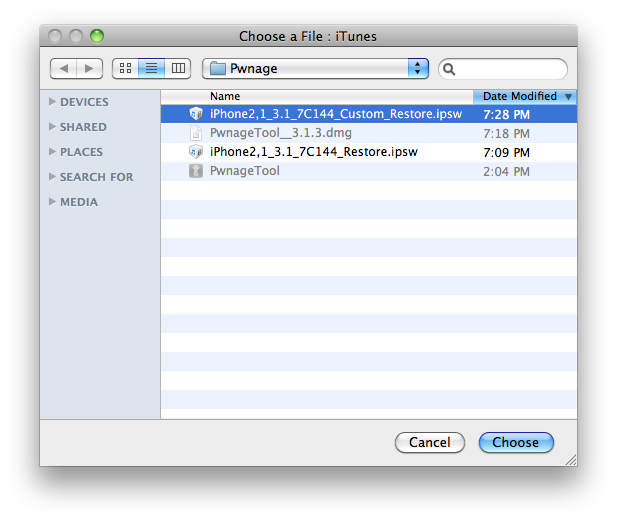
Step Eleven
Navigate to the Pwnage folder on your desktop using the dialog window that appears. Select the custom IPSW that was created (iPhone2,1_3.1_7C144_Custom_Restore.ipsw) and click the Open button.
Step Twelve
iTunes will now restore the firmware on your iPhone. This can also take up to 10 minutes. Once done you will be rebooted into jailbroken iPhone OS 3.1!
***THANKS: Thank you to the Dev-Team for their hard work in making this jailbreak and tutorial possible!


Source: iClarified.com
All aboard the update train! - Dev team jailbreaks for iphone 3GS 3.1
The iPhone 3GS is now supported in PwnageTool 3.1.3, assuming the phone was pwned at 3.0 or 3.0.1 - PwnageTool does not support the 3GS out of the box. If your iPhone 3GS has 3.1 preinstalled and is not Pwned then there is no tested jailbreak solution at the moment.
The iPod 2G is now supported in PwnageTool 3.1.3, assuming the iPod 2G was pwned at 3.0 or 3.0.1 - PwnageTool does not support the iPod 2G with 3.1 software out of the box.
- GOLDEN RULE: If you are using a iPhone 3G or iPhone 3G(S) with ultrasn0w and rely on ultrasn0w to obtain cellular service then you should only update your device with an .ipsw that is made with the new PwnageTool. There are no second chances with this. You need to remember that PwnageTool will provide an upgrade path to newer versions of the iPhone software in the future.
- Please read all parts of this post before downloading and using these tools.
- Read items 1, 2 and 3 again and again.
- At the bottom of this post are the bittorrent files for the 3.1 capable version of PwnageTool.
- PwnageTool will work for the iPhone 3GS assuming you have already Pwned it at 3.0 or 3.0.1
- PwnageTool will work for the iPod touch 2G assuming you have already Pwned it at 3.0 or 3.0.1
- PwnageTool WILL work for Original iPhone (1st Generation), the iPhone 3G and iPhone 3G(S) and the iPod touch (1st Generation and 2nd Generation) but NOT the iPod touch 3rd generation.
- For 3G and 3G(S) users who are Pwned, PwnageTool is your key to updating in the future, just remember to never install an update directly from Apple, always use an .ipsw that has been created with PwnageTool.
- There is no Windows version of PwnageTool it is a Mac OS X tool only, we are not developing a Windows version of PwnageTool.
http://xs1.iphwn.org/releases/PwnageTool__3.1.3.dmg.5107931.TPB.torrent
- http://apfelportal.de/host/images/PwnageTool__3.1.3.dmg
- http://imodzone.net/pwn/PwnageTool__3.1.3.dmg
- http://nevyn.nu/files/PwnageTool__3.1.3.dmg
- http://zcr.me/f/PwnageTool__3.1.3.dmg
- http://dl.opt-6.com/public/PwnageTool__3.1.3.dmg
- http://mirrors.c2wifi.org/iPhone/PwnageTool__3.1.3.dmg
- http://www.spiralnine.com/bin/PwnageTool__3.1.3.dmg
- http://www.hackthatphone.net/PwnageTool__3.1.3.dmg
- http://downloads2.touch-mania.com/PwnageTool__3.1.3.dmg
- http://coldgame.de/PwnageTool__3.1.3.dmg
- http://files.mackgoodstein.com/PwnageTool__3.1.3.dmg
- http://dev.poorlad.com/PwnageTool__3.1.3.dmg
Thanks to Dev team.
[Howto] Setup local 3GS restore verification server (ECID SHSH) - by iGuru
[Howto] Setup local 3GS restore verification server (ECID SHSH) - by iGuru
For anyone interested, i've just written a 710 word article about how the iTunes restore verification system works. You can access it via iGuru's Articles and you will need a PDF viewer to read it, until I get round to making a HTML version too.
---
First of all, let's get something straight.
It is not possible to downgrade/restore your iPhone 3GS to 3.0/3.0.1 unless you backed up your 3.0/3.0.1 ECID SHSH via Cydia.
So unless it says "This device has a 3.0 ECID SHSH on file." when you open Cydia (or 3.0.1) at the top of the web page above "Welcome to Cydia" you will only be able to back up your 3.1 ECID SHSH
The random blog/website article/whatever that you happened to find on Google will not work. Sure, it might have when Apple were still allowing you to restore to 3.0/3.0.1, but they are not any more. There is currently no known way around this. Sorry.
Background
Ok, no doubt you guys have heard that Saurik recently started collecting ECID SHSH's via Cydia.
All well and good, but what happens if it's down when you need to restore? That's where two tools by semaphore (known as xsemaphorex on this forum) come in. Combined you can not only get your ECID SHSH files, but setup a server on your computer that will allow iTunes to verify restores to previous versions.
The majority of people will use this to back up their ECID SHSH for 3.1, to be able to go back to it if they update to 3.1.2/3.2 when 3.1 restores stop getting signed by Apple.
However the lucky few that backed up their 3.0/3.0.1 SHSH using Cydia will be able to restore back to 3.0/3.0.1 - if you have, when you start Cydia it will say "This devices has a 3.0 ECID SHSH on file." (or 3.0.1 instead of 3.0) at the top of the Cydia webpage on start up.
Prerequisites:
Mac users will already have Java 1.5 or later on their system, and do not need to download anything extra.
Windows users will need to download and install Java Runtime Environment 5 or higher if you do not already have it installed on your system.
You can check this by: Start -> Run -> cmd.exe and then typing: java -version
If it is Java Version 1.5 or higher, you're good to go - if not, download and install Java from the link above.
Howto:
Ok, so first things first, you will need your iPhone 3GS ECID.
If you already have this, skip to Part 2.
Part 1 - Getting your ECID:
Put your iPhone 3GS into Recovery mode - switch it off, hold down the Home button, and plug the USB cable in. When it shows a picture of the iTunes logo and a USB cable, stop holding down home.
Windows:
1) Download USBView
2) Start USBView on your PC.
3) In “options”, check off ”config descriptors” (enable).
4) Hit F5 on your keyboard to refresh.
5) Scroll down until you see ”Apple Recovery (iBoot) USB drive”, and click on it.
6) Look for ECID in right navigation pane.
7) Copy the 16 digits that follow the ECID.
Mac:
1) Open System Profiler.app (In Applications -> Utilities)
2) Click USB and select the iPhone from the list, it will show the ECID there.
To get out of recovery mode, simply hold down Home + Power until your phone reboots.
Part 2 - Getting your ECID SHSH (Easy Way)
Windows Users: Make sure you have Java Runtime Environment 5 or higher installed.
1) Download Umbrella and extract to desktop, then download my Umbrella-GUI and again, extract to desktop.
2) Copy files Umbrella-GUI.jar to "fw-umbrella-semaphore" and the two files in Umbrella-GUI/lib to fw-umbrella-semaphore/lib.
Note: Umbrella-GUI.jar should now be in the same folder as umbrella.jar, and the 3 lib files should be in the lib folder making a total of 8 lib files there.
3) Simply double click Umbrella-GUI.jar, enter your ECID in the box, select version (see note below!) and click generate. A file called 00.shsh should appear in the folder.
Check your 00.shsh file is approx 64 KB, if it is not, it is not a valid ECID SHSH file.
Note: If you wish to get your 3.0/3.0.1 server your etc/hosts must point to Saurik's server and have your 3.0/3.0.1 ECID SHSH on file with Cydia.
If Cydia does not tell you that you have a 3.0/3.0.1 ECID SHSH on file, you will not be able to restore to 3.0/3.0.1 using this!
If you do have a 3.0/3.0.1 SHSH on file with Cydia, you can point to Saurik's server by doing this:
Windows:
1) Start -> Run -> C:\Windows\System32\drivers\etc
2) Right click "hosts" and click "Open" when the Open With box appears, select Notepad
3) Add this to a new line at the bottom: 74.208.105.171 gs.apple.com
4) Save the file
Mac:
1) Open Terminal.app (In Applications -> Utilities) and do: sudo nano /etc/hosts
2) Press the down arrow until you get to the bottom (empty) line
3) Type: 74.208.105.171 gs.apple.com
4) Press Ctrl + O, press enter, then Ctrl + X.
To verify you set it correctly:
Windows:
Open cmd.exe, and run ping gs.apple.com
It should respond:
Pinging gs.apple.com [74.208.105.171] with 32 bytes of data
Mac:
In terminal run ping gs.apple.com
It should respond:
Pinging gs.apple.com (74.208.105.171) with 56 bytes of data.
Getting your ECID SHSH ("Hard" Way)
Windows Users: Make sure you have Java Runtime Environment 5 or higher installed.
1) Download Umbrella Firmware & extract to desktop - this will create the folder "fw-umbrella-semaphore"
2) Start -> Run -> cmd.exe (Windows) Applications -> Utilities -> Terminal.app (Mac)
3) Type: cd Desktop/fw-umbrella-semaphore
Windows:
Run: umbrella.exe -e ecid -v version -c chipid
e.g. umbrella.exe -e 00000000AA00AA00 -v 3.1 -c 8920
Note: if you have 64bit Java installed, use umbrella64.exe instead!
Check your 00.shsh file is approx 64 KB, if it is not, it is not a valid ECID SHSH file.
Mac
Run: java -jar umbrella.jar -e ecid -v version -c chipid
e.g. java -jar umbrella.jar -e 00000000AA00AA00 -v 3.1 -c 8920
Check your 00.shsh file is approx 64 KB, if it is not, it is not a valid ECID SHSH file.
If you wish to attempt to retreive 3.0/3.0.1 SHSH blobs from Saruik's server, see the note from "Part 2 - Getting your ECID SHSH (Easy Way)" above.
Part 3 - Using TinyTTS to Restore
Windows:
1) Make sure 00.shsh is in the folder after running umbrella
2) Important! Disable any other servers using port 80 (usually webservers). TinyTTS needs to use it to create it's mini-webserver.
3) Run (double click) tinytss.exe (for if you have 32bit Java) or tinytss64.exe (for if you have 64bit Java)
Now you need to edit your etc/hosts again:
1) Start -> Run -> C:\Windows\System32\drivers\etc
2) Right click "hosts" and click "Open" when the Open With box appears, select Notepad
3) Comment out 74.208.105.171 gs.apple.com if it exists by putting a # in front so it looks like:
#74.208.105.171 gs.apple.com
4) Add this to a new line at the bottom: 127.0.0.1 gs.apple.com
5) Save the file
Open cmd.exe, and run ping gs.apple.com
It should respond:
Pinging gs.apple.com [127.0.0.1] with 32 bytes of data
If it does not say [127.0.0.1] you've not set hosts correctly, if it does, you can go ahead and restore to the version that matches your SHSH files using iTunes (See Part 4) :)
Mac:
1) Make sure 00.shsh is in the folder after running umbrella, then in Terminal.app type:
cd Desktop/fw-umbrella-semaphore
2) Important! Disable any other servers using port 80 (usually webservers). TinyTTS needs to use it to create it's mini-webserver.
3) Run: sudo java -jar tinytss.jar
Now you need to edit your etc/hosts again:
1) Open Terminal.app (In Applications -> Utilities) and do: sudo nano /etc/hosts
2) Comment out 74.208.105.171 gs.apple.com if it exists by pressing the down arrow until you get to it, then by putting a # in front so it looks like: #74.208.105.171 gs.apple.com
3) Press the down arrow until you get to the bottom (empty) line
4) Type: 127.0.0.1 gs.apple.com
5) Press Ctrl + O, press enter, then Ctrl + X.
In terminal run ping gs.apple.com
It should respond:
Pinging gs.apple.com (127.0.0.1) with 56 bytes of data.
If it does not say (127.0.0.1) you've not set hosts correctly, if it does, you can go ahead and restore to the version that matches your SHSH files using iTunes (See Part 4) :)
Part 4 - Using iTunes to downgrade
After checking the server is running, and gs.apple.com resolves to 127.0.0.1 as explained above, open iTunes 9
Note: 9.0.1 works fine, and I would recommend updating to 9.0.1 if you have not already.
1) Switch your iPhone off.
2) Hold down the home button and plug your iPhone up to the USB cable.
3) When iTunes opens and tells you your phone is in Recovery mode, hold down shift (Windows) option (Mac) then click Restore.
4) Now browse to the firmware you need to restore.
5) After selecting it, click Open.
If you are downloading from 3.1, you need to use this method to restore your phone twice.
The first time it should fail with "An unknown error occurred (1015)", basically, what has happened is that some of the NAND storage has been slightly reorganized in 3.1, and the 3.0 iBoot can no longer parse it.
Now, try again, this second restore is also going to fail with "An unknown error occurred (1015)", this is normal behaviour, don't worry. However, this second restore re-formats the NAND fixing the previous problem.
Note: If this does not work in recovery mode, try again, but using DFU mode instead.
Important (the last step) - Now, you need to re-jailbreak 3.0 and you're done:
If you are using an official carrier (Such as o2 in the UK, AT&T in the US, etc.) and have activated the firmware version you are restoring to previously you can use RedSn0w, as MuscleNerd kindly mentioned that if it has been officially activated before for that firmware version it will not hacktivate the phone.
However, if you are going to be using the official carrier and have not done so on that version before, you will need to use Purplera1n.
Anyone using unofficial carriers should use RedSn0w instead (though if you updated to 3.1, your baseband will have been updated and you will have lost the ability to use ultrasn0w to unlock).
That's all folks. Hope this clears up some of your questions!
Thanks so much to iGURU
....!!!
iPhone widget fun from PwnageTool creator @wizdaz :) see http://bit.ly/KutKe then give feedback at http://bit.ly/31vc9d from MuscleNerd & cpich3g
iPhone 3GS 3.1 JB IS COMING
cpich3g Further to my last post, the 3gs 3.1 jailbreak does not apply to OTB or non-downgradable 3.1 device - fROM Dtube twitter
Wednesday, 23 September 2009
Sunday, 20 September 2009
Subscribe to:
Posts (Atom)
